
Azure Active Directory Authentication with OfficeDev PnP PowerShell
This is a first post in a series of 2. See http://www.erwinmcm.com/azure-active-directory-app-only-authentication-with-officedev-pnp-powershell for the second post).
Today I released an update to the Connect-PnPOnline cmdlet so that you can use it to create a connection using an Azure AD client ID. Notice that this release is currently (July 2015) not available in the master branch, but right now only in the dev branch. So if you want to use this right now, make sure you have the latest dev branch available. You can download the latest developer branch here: https://github.com/pnp/pnp-powershell/tree/dev
If you’re reading this after August 2015, then you’re all set, as you have the latest bits.
In this post I will go into how to create a Native Application in your Azure AD and how to use the Office 365 Developer Patterns and Practices PowerShell Cmdlets (I know… it’s a mouth full, so from now on I’ll refer to them simply as ’the cmdlets’). The next post I will go into how to use the cmdlets to perform App Only calls, so you can use the cmdlets unattended. This is a somewhat more complex configuration, requiring you to create a certificate, or buy one in the case of a production environment, and then configure the application in Azure to use this certificate for authentication.
Setup the app in your Azure AD
- Navigate to https://manage.windowsazure.com and open your Azure AD.
- Select the “Applications” tab and click “Add” in the bottom of the page.
Select “Add an application my organization is developing”
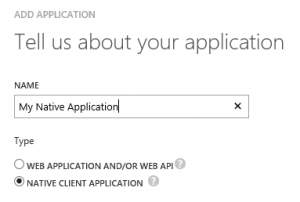
- Pick a name and select Native Client Application
- Navigate to step 2 of the wizard and enter a URI. This can be any URI, it doesn’t have to point to an existing site. We will use this URI later in the cmdlet so make a note of it (you can always find this URI later by opening the app configuration in your Azure AD, so no worries if you forget it).
- Confirm and after a few seconds you will see a confirmation screen.
- Navigate to the “Configuration” tab and click the big green “Add Application” button.
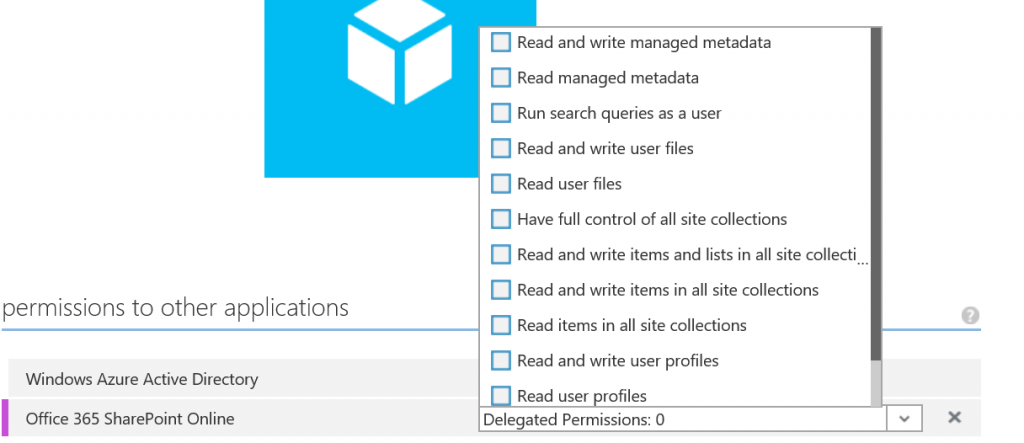
- Select “Office 365 SharePoint Online” and confirm your selection.
- Pick the appropriate rights and click “Save” in the bottom of the page.
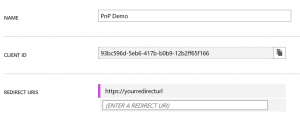
- If you scroll up on the page, you will see a CLIENT ID, a GUID. Copy this value.
Connecting with the cmdlets
Open PowerShell, and enter:
Connect-PnPOnline -Url "https://<yourtenant>.sharepoint.com/sites/<yoursite>" -ClientId "<theclientidyoucopied>" -RedirectUri "<theredirecturlyouentered>"
So in the case of the configuration above, the command would look like:
Connect-PnPOnline -Url "https://demopnptesttenant.sharepoint.com" -ClientId "93bc596d-5eb6-417b-b0b9-12b2ff65f166" -RedirectUri "https://yourredirecturl"
Press enter. You will see a popup where you will have to authenticate. Now you have a valid ClientContext and you can perform tasks with the cmdlets and the client context that fit within the permissions granted to the application. Try for instance Get-PnPList to retrieve all lists in the site.
Good to know
The cmdlets use an internal file cache, persisting the access tokens. Normally these tokens are stored in memory, which is cleared the moment the cmdlet is done executing. For that reason a file cache is used. If you want to clear the cache, add the -ClearTokenCache parameter to the Connect-PnPOnline cmdlet. You will be prompted to authenticate again. The cache file is located in %APPDATA%\OfficeDevPnP.PowerShell and is called tokencache.dat. If you want to navigate to that folder with the PowerShell:
cd $env:APPDATA\OfficeDevPnP.PowerShell